Tutor LMS Tutorial
You’ll learn to build an online course for free using WordPress and the Tutor LMS plugin. We use the free version in this video tutorial here:
We also did a previous tutor LMS quick tutorial back in 2020:
Why Tutor LMS
This was the best LMS plugin we could find that includes a WooCommerce payment feature. Most other LMS plugins will only provide WooCommerce in the paid version of their plugin.
What You’ll Need to Get Started
To get started building a course with Tutor LMS you will need:
-Web hosting. Check our resources page for recommendations.
-WordPress installed & a basic website (The start of this video is a good guide if you don’t have this yet)
Setting up a Starter Template in Astra Theme
In our demo we use the Astra theme and a starter template. We found the template called ‘life coach’ works well here because it already has a basic WooCommerce store setup on it.
Setting up WooCommerce
You’ll need WooCommerce setup. This is generally as easy as running through the setup wizard which you can access as soon as you install and activate the plugin.
We have a video that does a quick run through of the WooCommerce setup here:
You’ll also need a Payment gateway like PayPal or Stripe. We have a PayPal setup video here:
And we have a Stripe video here:
Installing Tutor LMS
Tutor LMS can be installed through your WordPress dashboard. Under add new plugins simply search, install and activate.
Setting Up the Tutor LMS Plugin
Let’s check the Tutor LMS plugin settings. Most of the settings can be left default but the key things to check are:
-Select WooCommerce under Monetization
-Select ‘enable add to cart for guest users’ under WooCommerce
Building a Course
Build a course in Tutor LMS consists of adding lessons and making some quizzes. This is pretty straight forward.
Making Lessons
Making lessons are just like adding blog posts in WordPress. We can use the block editor or the classic editor for this. You can embed media like pictures or videos here too.
Making Quizzes
Quizzes in Tutor LMS were pretty easy to add. We particularly liked adding multiple choice questions to build simple online quizzes. This is a great way of checking that your students have grasped the basic concept of each lesson.
Video Courses
You can embed videos from your library – but make sure your hosting in powerful enough to provide video content. In most cases, when you are using shared WordPress hosting, or a smaller VPS it will be better to embed video from a dedicated video provider.
The obvious choices for video hosting are YouTube and Vimeo. If you are distributing free courses, then YouTube is probably the best choice here since it will also bring your some traffic from the YouTube platform itself. If you are looking at making a paid course, then Vimeo is probably the best choice. Vimeo has a lot of good privacy options to help ensure that only your course members can access your content.
WooCommerce – Making a Product
You need to make a product in WooCommerce that corresponds to the course you just built. This means going to ‘Products’ in your WordPress dashboard. Then making a ‘new product’. This is just a matter of filling in the form and setting a price.
A couple key points are that you should tick Virtual, Downloadable and ‘For Tutor’ in your product data settings.
Also add a product image on the right sidebar, to make your checkout process and shop page look better.
Connect WooCommerce Product to Tutor LMS
Now go back to Tutor LMS > Courses and find the course you just made. Click edit and find the ‘select product’ dropdown. Here you just choose the product you made in WooCommerce.
Redirect to Dashboard Code
Code we used to redirect to the Tutor LMS dashboard after login – use this in a code snippet or in your functions.php file:
// snippet to redirect

add_filter( 'woocommerce_login_redirect', 'custom_woocommerce_redirect_after_login', 9999, 2 );

function custom_woocommerce_redirect_after_login( $redirect, $user ) {

        $redirect = '/dashboard'; // put your dashboard page here - without the http and domain

    return $redirect;
}
Clean up the Courses Archive Page
CSS used to hide some elements from the course archive, as we used in our latest video:
.courses-archive-hero-section {
	display: none
	}

.tutor-course-archive-results-wrap {
	display: none
	}

.tutor-course-archive-filters-wrap  {
	display: none
	}
WooCommerce Accounts & Privacy Settings
We set up our WooCommerce account settings like this:
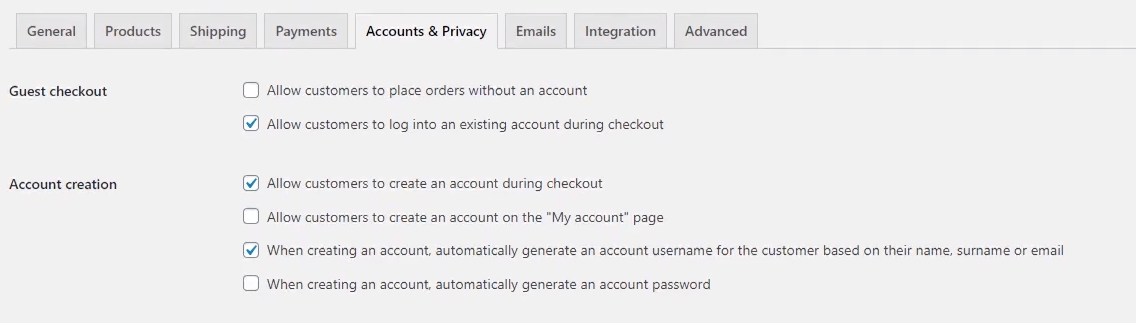
You need to make sure customers are able to create an account during checkout. It’s best to automatically generate the username. You can either let the user determine a password or WooCommerce can generate a strong password and email it to the user after checkout.
Make an add to cart button on the main page
Hover the mouse near your WooCommerce product to find the product number:
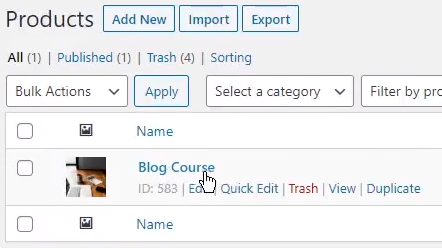
You can make an ‘add to cart’ link by adding the number to a URL like this:
https://demo.com/?add-to-cart=583Just change the demo.com part to your own site. It’s a simple matter of adding this link to any button in your page. You can build a nice landing page to help sell your course, or put a clear button on your front page for example.
Improving the Cart and Checkout Experience
You can make the Cart and Checkout look a lot better using the WooCommerce blocks plugin. We have a video tutorial on this here:
Conclusions & Tutor LMS and Alternatives
Overall, Tutor LMS is a nice choice if you are looking at building an online course. We’d say that the free version is probably the best free option available at the moment and the paid version adds even more good features.
The obvious alternative is LearnPress which we previously covered here. This is a good option too but it didn’t seem quite as polished as Tutor LMS and lacks the free WooCommerce integration.
If you are looking more toward a paid solution however and your LMS needs are business critical? Then check out LearnDash. This is the cleanest and most professional of all the available options on WordPress.
We have a complete setup for LearnDash here using the LearnDash academy template:
This template is available for free from the Astra starter template library too! Installing it will automatically give you WooCommerce integration. Not only that, but this includes CartFlows which further optimizes LearnDash to make for a simplified sales experience. No doubt that this system will convert much better than the default setup used by a standard WooCommerce installation. Make sure you check out the video above before making your decision.
In summary, we’d say if you are on a super tight budget or are starting from zero then Tutor LMS can be a nice way to get started in the world of online course sales. If you are working on an established business or need to provide an education or training solution to a school or business client? Go for LearnDash.